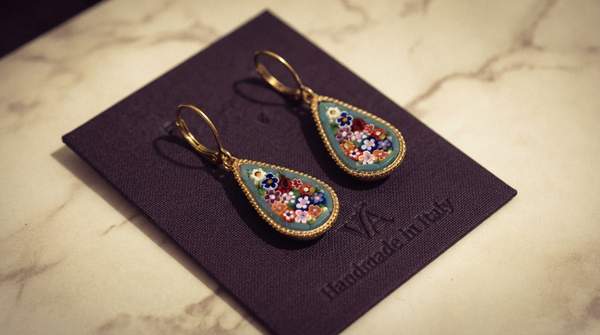
Micro-mosaic jewelry is built from tesserae—fragments of glass or enamel sometimes under a millimeter across, small enough that a microscope may be needed to place them—set into a slow-drying stucco to form miniature scenes. The technique, long attributed to late-18th-century Rome, is now traced by recent research to the early 1600s, and it reached its artistic peak between 1810 and 1840, when Grand Tour travelers carried it across Europe as the ultimate souvenir. Understanding both the four-stage process and the historical arc reveals why each piece represents such extraordinary labor.
The Enduring Allure of Micro-Mosaic Jewelry
The roots of the form trace back to the mosaics of ancient Rome, but the miniature adaptation belongs to a later era: craftsmen in Florence and the Vatican, during the Renaissance, began refining the technique now known as micro-mosaic and adapting it to jewelry, as the Gemological Institute of America recounts. What distinguishes the micro-mosaic from its monumental ancestors is scale. Where a floor mosaic commands a room, a micro-mosaic must resolve a Roman ruin, a pastoral idyll, or a portrait within the face of a brooch or ring.
That compression is what makes the craft so demanding. A single piece, as antique specialists at Mozeris Fine Antiques note, might contain thousands of individual tesserae, each requiring precise placement—work that can amount to hundreds of hours of meticulous craftsmanship. The result is an image with no brushstroke and no engraver's line: a picture assembled entirely from solid color.
The Four Stages of Micro-Mosaic Creation
The complete workflow, reconstructed from accounts of the traditional Roman technique, unfolds in four sequential stages. Each stage depends on the one before it, and none can be rushed.
| Stage | Materials and Tools | Key Actions |
|---|---|---|
| 1. Material Preparation | Opaque vitreous glass or enamel (smalto); linseed oil and powdered slaked lime or marble for stucco | Smalto is melted and pulled into thin rods or threads (filati), cooled, then cut into minute tesserae; stucco adhesive is mixed |
| 2. Design and Base Preparation | Watercolor rendering; copper, gold, silver, or black Belgian marble base | A watercolor of the piece is painted; the metal backing is prepared and treated; the design is planned for transfer |
| 3. Tesserae Assembly | Fine tweezers, cutting implements, magnifying equipment or microscope | Each tessera is selected, cut, and individually positioned into the slow-drying stucco following the design |
| 4. Finishing | Polishing compounds and protective coatings | The mosaic dries slowly, then is polished to a smooth, lustrous surface and protected |
The logic of this sequence is worth pausing over. The slow-drying stucco is what makes the third stage possible: because the adhesive remains workable, the artisan can adjust and reposition tesserae mid-assembly. And the extreme smallness achieved in the first stage—tesserae as little as the lead in a mechanical pencil, roughly one millimeter, as one jeweler described—is what allows the finished image to read as a continuous painting rather than a grid of tiles.
Stage 1: Crafting the Miniature Tesserae and Stucco
Everything begins with smalto, an opaque vitreous glass or enamel produced in a multitude of colors. The artisan melts the glass and pulls it into thin rods or threads known as filati—literally, spun enamel—which are left to cool. Once hardened, the filati are cut into hundreds of minute cubes, the tesserae themselves. Enamel artist Rebecca Di Filippo, who documents the Roman technique, notes that these microscopic tiles are set into a special adhesive known as micromosaic stucco or putty: a slow-drying mixture of linseed oil and powdered slaked lime or marble.
Both halves of this stage matter equally. The filati determine the palette and the fineness of detail available to the artist, while the stucco's slow-drying nature is what allows for meticulous placement and adjustment of the tiny pieces during the long assembly to come.
Stage 2: Design Transfer and Base Preparation
Before a single tessera is set, the image exists as a watercolor rendering of the intended piece—a painted study that guides color planning and composition, as GIA describes in its account of the process from start to finish. In parallel, the base is prepared: traditional backings include copper or gold trays, along with silver, and during the mid-nineteenth century some workshops carved out black Belgian marble, "Noir Belge," to serve as the background. The base must be treated and ready to receive the stucco, since the adhesive and the metal or stone beneath it form the structural body of the jewel.
Stage 3: The Meticulous Assembly of Tesserae
Assembly is the heart of the craft and its most punishing test of patience. Working with fine tweezers and magnifying equipment—sometimes an actual microscope, when tesserae shrink to their smallest dimensions—the artist selects, cuts, and positions each piece individually into the stucco, following the transferred design. The tesserae are arranged to create a scene, portrait, or landscape, and a single composition may involve thousands of placements. Because the stucco dries slowly, the artisan can correct course; but every tessera must still be chosen for its exact hue and cut to its exact size, since the image is built from nothing but these solid fragments of color.
Stage 4: Finishing and Polishing the Masterpiece
The final stage rewards the restraint exercised throughout. The assembled mosaic is left to dry slowly—haste here would undo weeks of placement—after which the surface is polished to a smooth, lustrous finish and given protective coatings. Polishing is not cosmetic afterthought but the step that reveals the artwork's intricate details and vibrant colors, flattening the joins between tesserae so that, at jewel scale, the image reads as continuous. It is crucial to both the final aesthetic appeal and the durability of the piece.
A Journey Through Time: The Evolution of Micro-Mosaic
The history of the form has itself been revised. Micromosaic was initially believed to be a late-18th-century invention, developed in Rome around the 1770s at the Vatican mosaic workshop by Cesare Aguatti and Giacomo Raffaelli. However, recent research indicates its origin dates back to early-1600s Rome, with a Calandra "Holy Family" signed and dated 1622 as one of the earliest surviving examples—an evolution that involved adapting larger mosaic techniques to delicate, wearable art.
The golden age arrived between 1810 and 1840, fueled by the Grand Tour. Affluent tourists wanted mementos of their travels, and micro-mosaic depictions of famous sites—ancient ruins, pastoral scenes, animals—were beautiful keepsakes; the period saw a peak in both production and artistic quality. From the mid-1800s, high-quality workmanship generally declined as less-discriminating tourists accepted pieces of lesser quality. Yet the art was not lost: the Castellani family revived traditional techniques and, according to Rudoe and Gere's account of the Castellanis' scheme, centered their work on a political idea—demonstrating, within accepted boundaries, their enthusiasm for a unified Italy. Today, GIA notes, only a handful of boutiques still make high-end pieces, sustained by a new generation of craftspeople.
Appreciating the Enduring Craft of Micro-Mosaic
To fully appreciate micro-mosaic jewelry, focus on understanding the meticulous, multi-stage artisanal process and its rich historical evolution rather than treating the piece as simply a painted-looking antique. The reader can identify the key materials—smalto, filati, and stucco—and the distinct stages of creation when viewing a micro-mosaic piece: look for the individual tesserae under magnification, the metal or marble base at the edges, and the polished surface that unifies them. A piece that rewards that inspection, with tesserae too fine to count and an image that holds at arm's length, is the measurable signature of the craft at its peak.
Sources
- Micromosaic — Antique Jewelry University
- The Magic of Micro-Mosaic Jewelry — GIA 4Cs
- Micro Mosaics Jewellery & History — Mozeris Fine Antiques
- What Is Roman Micro Mosaic? History, Materials, and Technique — Rebecca D. Enamel